Irrational Number Line Games, LLC
home stuff-to-buy about-us contact
Asphault
This is a quick set of WIP pix and a little advice (or maybe motivation) on how you, too, can make some pretty decent modern terrain boards fairly easily and for not a lot of money.
 This is pretty simple, but as Mary Poppins says, "Well begun is
half done!" So we are starting with a basic material, black foam
board. You can get this anywhere. I chose black for two reasons:
(1) we are making weathered asphault, so when we add cracks and
potholes, there will already be black underneath, (2) for some
reason, the non-gloss black paper peels off easily. No, really.
This is pretty simple, but as Mary Poppins says, "Well begun is
half done!" So we are starting with a basic material, black foam
board. You can get this anywhere. I chose black for two reasons:
(1) we are making weathered asphault, so when we add cracks and
potholes, there will already be black underneath, (2) for some
reason, the non-gloss black paper peels off easily. No, really.
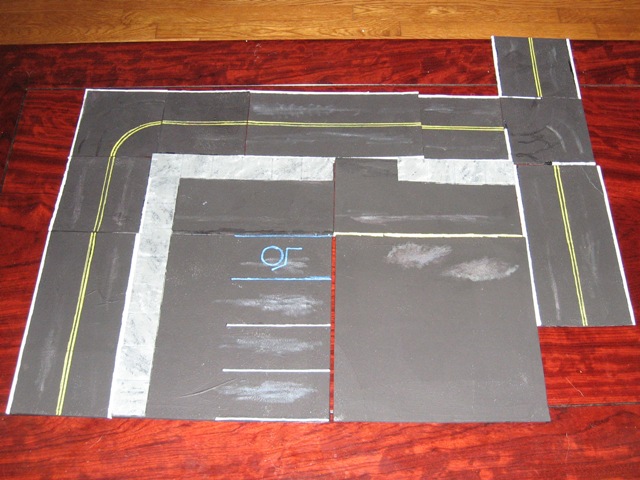
But before we get peeling, we want to do our layout. This is a modular system based on 6" and 12" sides. An important element is that for 28mm gaming, a good side lane for a car is 3". It might be a little wide for some places and roadways, but it fits 1:43 to 1:48 cars well with a little room on the sides to pick them up without banging your fingers into other things. Cars move. We should accomodate this.
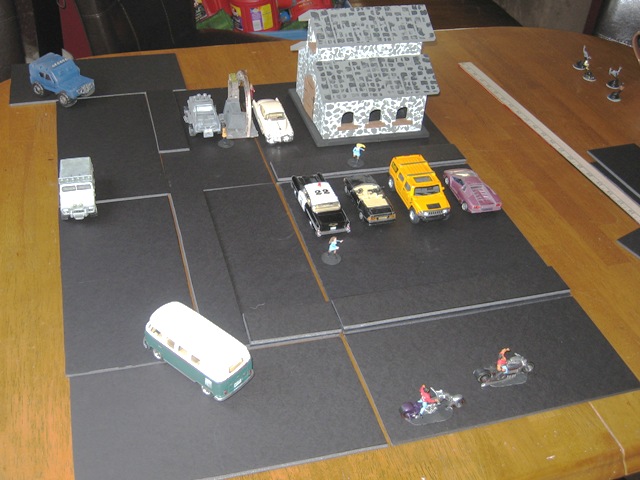
The QwikE Mart spot is broken up into two 12"x12" sections. This is about as large a piece as you want to make. They are reasonable to handle (and put in the post) and will stack on most shelves (like ones designed for records or scrapbooking stuff). This size piece also stands up to regular wargame abuse without a lot of breakage -- larger pieces tend to crack under the strain.
I also have some smaller (1.5" wide) sidewalk pieces. These will help break up the uniformity of the asphault and add some separation between the roads and the parking lot.
 Now, there's not much to do other than peel the pieces and paint. You
should only peel off one side of the paper. If you remove them both,
your pieces will be too flimsy and you will likely break them up into
rubble while doing it anyway. Will this cause the boards to warp? Yes,
but we can deal with that easily later.
Now, there's not much to do other than peel the pieces and paint. You
should only peel off one side of the paper. If you remove them both,
your pieces will be too flimsy and you will likely break them up into
rubble while doing it anyway. Will this cause the boards to warp? Yes,
but we can deal with that easily later.
I put an initial coat of magnetic paint down. It is pretty thick, so it smoothes out the foam side. Also, it's magnetic. (The judicious use of magnets on the bottom of the sidewalk and buildings will help keep the layout from sliding around.) Then I just went ahead and did the lines. I put down strips of painter's tape and painted between them. For this line layout, notice that I can just lay the tape down all the way across. There are no fancy patterns like dashed lines or stripes. I went ahead and freehanded the handicap spot, using a Sharpie paint pen.
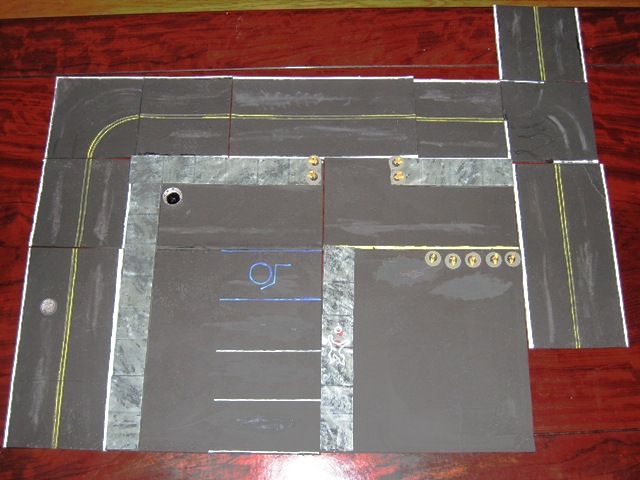
The tire marks are pretty important. They are the type of detail that no one will notice, but subconsciously, they add to the realism and feel of the piece. I have had absolutely no luck photographing the oil slicks. I did them with silver paint, mixed with a small dab of green, red, yellow, and blue. When you layer several colors of lightly colored silver paint like this, you get a nice rainbow sheen. In person. Not in the photos.
I pressed a ruler down across the sidewalks to make the indentations for separate blocks and then painted them with four colours of grey. The sidewalk in front of the store was not part of the original plan, and I added an extra plain piece so you don't have to use the decapitated chalk outline piece ... but who wouldn't want that?
There are some yellow pole barriers on the board here. They are just extra bits of pole I had on top of magnetic bases. I have a 1" hole punch. When you apply that to free refrigerator magnets and bumper stickers that people hand out, you end up with a nice supply of magnetic figure bases.
The bits are rounded out with a manhole cover (28mm base on top of a magnetic base) and an oil pit (bottle cap with gloss black paint inside, also on a magnetic base).
 OK, I've said magnetic base a bunch of times now. So how magnetic are the
boards and bases? Well, they won't erase your credit cards and I wouldn't
want to hang over a cliff supported by them ... but they do hold their
own weight. Literally. So, if somebody bumps the board, all the little
(light) bits won't slide around like an earthquake.
OK, I've said magnetic base a bunch of times now. So how magnetic are the
boards and bases? Well, they won't erase your credit cards and I wouldn't
want to hang over a cliff supported by them ... but they do hold their
own weight. Literally. So, if somebody bumps the board, all the little
(light) bits won't slide around like an earthquake.
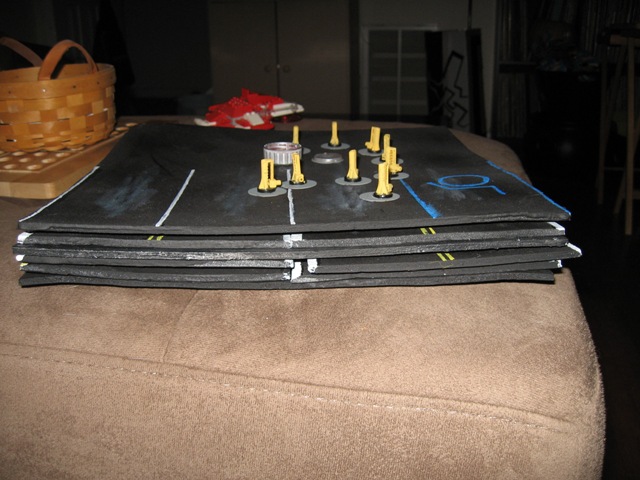
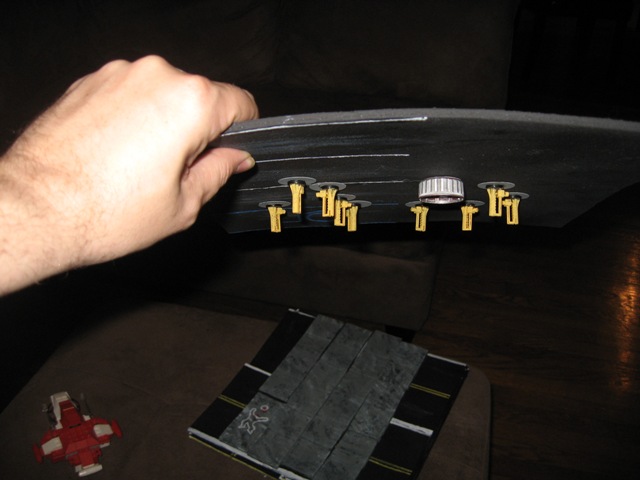
 Now, even though the paper keeps the board fairly rigid, you can see it
bowing under its own weight in the above pic. And they will naturally
warp toward the peeled side. The way to deal with that is to score the
backs up with little cuts. Don't go through the board, just enough to
cut the paper and relieve the surface tension (I guess - though this
seems counter intuitive to me). Then you can bend the boards back and
they will stay flat. I also put a few strips of tape across the backs
to keep them sound.
Now, even though the paper keeps the board fairly rigid, you can see it
bowing under its own weight in the above pic. And they will naturally
warp toward the peeled side. The way to deal with that is to score the
backs up with little cuts. Don't go through the board, just enough to
cut the paper and relieve the surface tension (I guess - though this
seems counter intuitive to me). Then you can bend the boards back and
they will stay flat. I also put a few strips of tape across the backs
to keep them sound.
How flat does that really keep the boards? Well, look for yourself at the stack down there. They lay pretty flat on the table and stack to be put away nicely. If you warp them a bit during storage, they will bend back into shape with just a little bend.