Irrational Number Line Games, LLC
home stuff-to-buy idea archive about-us contact
Cornering the Market
 So, I got asked for some WIP pics to support "hardening" the terrain for my
Infected scenario.
So, I got asked for some WIP pics to support "hardening" the terrain for my
Infected scenario.
First thing first, what are we talking about?
Here is the 2D set up. Floorplan flats with crate and equipment tokens. There are also simple a-frame paper minis included (in case you don't have a vast collection of 28mm doomed-scientists-in-orange-parka miniatures).
 ... and this is the "simple" 3D set up. You use the same floors, but add some
fold-in-half walls to them and simple 5 sided boexs (no bottoms) for the crates
and equipment.
... and this is the "simple" 3D set up. You use the same floors, but add some
fold-in-half walls to them and simple 5 sided boexs (no bottoms) for the crates
and equipment.
 So here's how you go about that (in stereo, I'm making two more).
First, you cut all the templates out. Note that I separated the wall halves and cut off the tabs on the bottom that allow you to connect the walls to the floors. The templates are now just one big 6"x9" piece, two 6"x2" pieces and two 9"x2" pieces.
So we need one each of 6"x9", 6"x2", and 9"x2" cardboard strips (or foamcore). But since they are supposed to fit together and still be the same size, we need to do a little trimming to account for the thickness of the cardboard.
For all four walls, cut off one cardboard thickness along the long side. This allows the walls to sit on top of the floor, but still be 2" tall, so the template on the outside won't have a gap.
We also need one of the walls to be one thickness shorter; I chose the long wall.
The red lines I drew show where to trim the pieces by the thickness of the material you are using.
 This step is pretty easy. Glue the floor templates on the floor pieces. The inset
picture shows me applying Elmer's wood glue with a paint brush. I like to use wood
glue for gluing paper to things. It is pretty thick, so it brushes on stiff and doesn't
liquefy under the paper, making those bumps and such (or making the colors run). If
you use wood glue and reasonably thick cardstock, you should end up with a good, smooth
surface.
This step is pretty easy. Glue the floor templates on the floor pieces. The inset
picture shows me applying Elmer's wood glue with a paint brush. I like to use wood
glue for gluing paper to things. It is pretty thick, so it brushes on stiff and doesn't
liquefy under the paper, making those bumps and such (or making the colors run). If
you use wood glue and reasonably thick cardstock, you should end up with a good, smooth
surface.
 Now we've flipped the floors over and taped the walls (without stuff on them yet) to
the bottom of the floor. That little gap between the floor and the wall needs to be
the same as the thickness of the board you are using. I actually tape them on with
the walls at an angle.
Now we've flipped the floors over and taped the walls (without stuff on them yet) to
the bottom of the floor. That little gap between the floor and the wall needs to be
the same as the thickness of the board you are using. I actually tape them on with
the walls at an angle.
 Once you have both walls in position, fold them up and tape the corner closed. With
that duct tape there, this is now a pretty sturdy little structure.
Once you have both walls in position, fold them up and tape the corner closed. With
that duct tape there, this is now a pretty sturdy little structure.
Since we have this put together solidly, it's time to put the wall textures on to hide the carboard and duct tape. Doing the steps in this order lets us build the box, use rugged duct tape for the corners, and have no seams showing.
 But one last detail. Remember that we cut some off the walls to make the fit?
Well, that's so the outside dimension would fit. But now the inside wall textures
are too big. Once you glue them in place, a little trim is in order.
But one last detail. Remember that we cut some off the walls to make the fit?
Well, that's so the outside dimension would fit. But now the inside wall textures
are too big. Once you glue them in place, a little trim is in order.
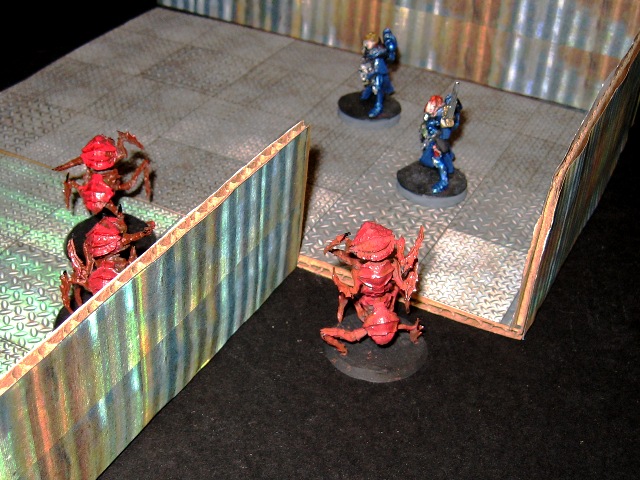 And here's an application other than the
Infected
game. Really, a dozen or so of these has a lot of possibilities.
And here's an application other than the
Infected
game. Really, a dozen or so of these has a lot of possibilities.
Enjoy!