Irrational Number Line Games, LLC
home stuff-to-buy idea archive about-us contact
Sci Fi Longhouse Scratchbuild
 Longhouses. Pretty simple. Triangles on the ends and roof over top.
OK, but I am going to scifi them up a bit to go with my Space Wolves. And I want more than a simple longhouse, so I am going for a complex of connected structures.
So the start is simple - figure out the base and height I want for the footprint I need, then make the triangles. I marked off a set of guide lines the right height, then did a set of half-width ones (light blue). Then I can just connect the corners (light green).
 This gives me a series of isosceles (you took geometry in high school,
right?) triangles interleaved between the two height guides.
This gives me a series of isosceles (you took geometry in high school,
right?) triangles interleaved between the two height guides.
I have two sizes, one pair for the big piece, then three smaller ones for the connectors. To make the small ones, I just clip the bottoms off to the same height. This makes them all the same proportion without doing a bunch of ratio calculations.
Now, for the roofs. Let's see .. the square of the hypotenuse is equal to the ... wait other geometry says I don't have to do that.
 With the three smaller ones, similar triangles tells me that isosceles
triangles will make a ruler like this. This also gives me a check on
my triangle angles to know they are close enough.
With the three smaller ones, similar triangles tells me that isosceles
triangles will make a ruler like this. This also gives me a check on
my triangle angles to know they are close enough.
So instead of calculating the length of the other side, I just use it to measure the length I need for the roofs.
 This is the bit where looking at the end first helps. I want the
smaller ones to connect to the angled roof of the big one. So I need
to know the angle of the intersection.
This is the bit where looking at the end first helps. I want the
smaller ones to connect to the angled roof of the big one. So I need
to know the angle of the intersection.
But again, I don't need to calculate. With one of the triangles positioned like this, you see that the angled side is longer than the height. Got it. But I also know that the angle has to go in half the base of the triangle it connects to. So I draw a line from one corner of the roof piece to the point half a small base in (the red circles).
 That gives me these pentagon/house shaped pieces that fold in half to
make the roofs for the smaller ones. Square on one end and the angle
on the other end ...
That gives me these pentagon/house shaped pieces that fold in half to
make the roofs for the smaller ones. Square on one end and the angle
on the other end ...
 ... lets us connect them like this. Hopefully those last steps are
less confusing now. The whole "half base angle thing" was to make the
slope where the small ones touch the big one.
... lets us connect them like this. Hopefully those last steps are
less confusing now. The whole "half base angle thing" was to make the
slope where the small ones touch the big one.
 In real life the beams I am adding support the structure. For the
model, the structure supports the beams. I need a drink to think
about that for a while...
In real life the beams I am adding support the structure. For the
model, the structure supports the beams. I need a drink to think
about that for a while...
 So this is the hardest part. I thought about doing an actual
cross-lap joint
(two overlapping dados), but that was too fiddle, and while a cross-lap
is a really strong joint, as I said, the beams are not supporting the
structure, so I just laid the beams on the angle, and marked the
overlap. And cut one beam all the way through, attaching it on both sides.
So this is the hardest part. I thought about doing an actual
cross-lap joint
(two overlapping dados), but that was too fiddle, and while a cross-lap
is a really strong joint, as I said, the beams are not supporting the
structure, so I just laid the beams on the angle, and marked the
overlap. And cut one beam all the way through, attaching it on both sides.
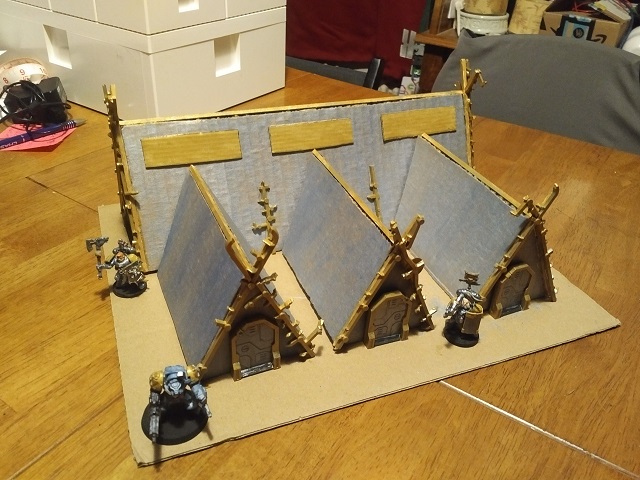
 That gives us this. I decided to not glue the doors on. This gives a
good modular option, so I can decide what door locations fit the
scenario, rather than work the scenario around a fixed terrain piece.
That gives us this. I decided to not glue the doors on. This gives a
good modular option, so I can decide what door locations fit the
scenario, rather than work the scenario around a fixed terrain piece.
 Now we scifi them up. I put pieces of sprue on top of the beams to
make them look ... well, whatever that looks. And I went with my
SW colour scheme
Now we scifi them up. I put pieces of sprue on top of the beams to
make them look ... well, whatever that looks. And I went with my
SW colour scheme
 Here's a good shot of a door and a figure to give some scale sense.
 And the sides. I consulted with SWMBO about the additional bits. I
decided to go with the sprue on the side of the big house to add a
little more character. She said solar panels on the top would look
good. A good suggestion for an expiditionary structure.
And the sides. I consulted with SWMBO about the additional bits. I
decided to go with the sprue on the side of the big house to add a
little more character. She said solar panels on the top would look
good. A good suggestion for an expiditionary structure.
 And here are a few of the hundreds (thousands if you count door
placement) of configurations.
And here are a few of the hundreds (thousands if you count door
placement) of configurations.