Irrational Number Line Games, LLC
free-stuff stuff-to-buy about-us home contact
Archive of the Idea of the Week: Terrain
* Christmas Ornament Conversions
Lighter Than Air / In Another World
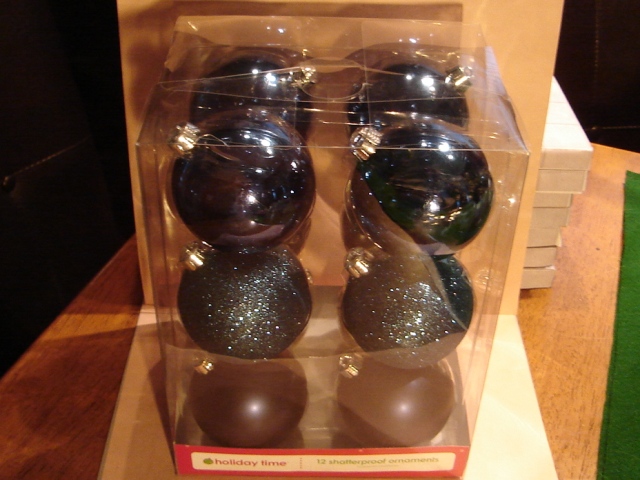 Well, it's Christmastime, and that means lots of decorations, nick-nacks, and general
folderol all over the craft and discount stores. And tons of it for grabs real cheap
on the 26th! So, here are a couple of ideas for what to do with some of those round
Christmas tree ornaments that seem to be for sale nearly everywhere. And, for a bonus,
a couple of different ideas on what to do with the packing.
Well, it's Christmastime, and that means lots of decorations, nick-nacks, and general
folderol all over the craft and discount stores. And tons of it for grabs real cheap
on the 26th! So, here are a couple of ideas for what to do with some of those round
Christmas tree ornaments that seem to be for sale nearly everywhere. And, for a bonus,
a couple of different ideas on what to do with the packing.
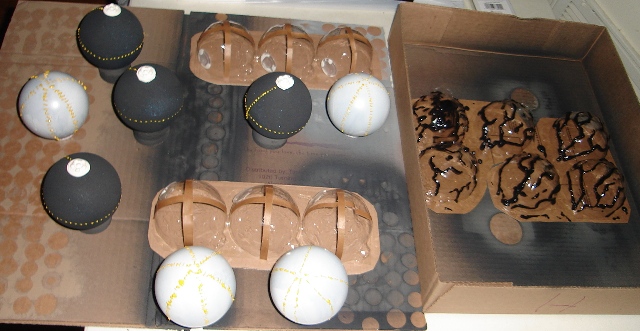 The bulbs, being spheircal and of reasonable size to manhandle, are just right for making
hot air baloons -- a staple of both pulp and historical wargames. The more textured
bulbs don't work for that, but they will be put to work as tv pulp scifi pods. And the
form fitted plastic around them gives us some nice fodder for some more realistic sicif --
some deployable habitats and some organic pods of doom.
The bulbs, being spheircal and of reasonable size to manhandle, are just right for making
hot air baloons -- a staple of both pulp and historical wargames. The more textured
bulbs don't work for that, but they will be put to work as tv pulp scifi pods. And the
form fitted plastic around them gives us some nice fodder for some more realistic sicif --
some deployable habitats and some organic pods of doom.
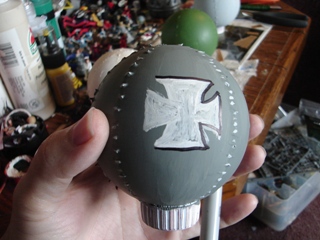 So, working on the hot air baloons, the first step was to score them, like peeling
an orange, to make a seam where the baloon is sewn together. Since these will be evocative
instead of physically realisitic, I ran stitches down the scores (puff paint - liquid
latex used for t-shirt decoration). They are primed with a Krylon indoor/outdoor
white spray paint (which is good for basecoating dissimilar materials). Then I selected
colors and added insignia. The insignia are layered: I put down a background layer
for the whole shape, then added sharp details with Sharpie, and finally filled in the
spaces with paint. I ended up splooging over the edges a bit, so I had to go back
and touch them up a bit with extra paint.
So, working on the hot air baloons, the first step was to score them, like peeling
an orange, to make a seam where the baloon is sewn together. Since these will be evocative
instead of physically realisitic, I ran stitches down the scores (puff paint - liquid
latex used for t-shirt decoration). They are primed with a Krylon indoor/outdoor
white spray paint (which is good for basecoating dissimilar materials). Then I selected
colors and added insignia. The insignia are layered: I put down a background layer
for the whole shape, then added sharp details with Sharpie, and finally filled in the
spaces with paint. I ended up splooging over the edges a bit, so I had to go back
and touch them up a bit with extra paint.

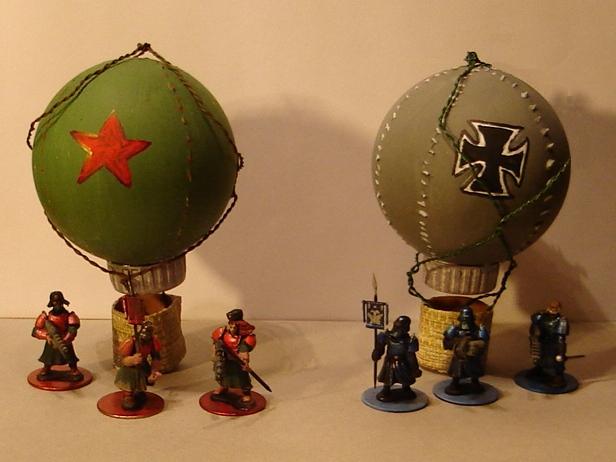
The balloons then need gondolas and attachment ropes. The gondolas are just
textured pieces of contact paper. The ropes are lengths of floral wire twisted together
and painted up as ropes. Using floral wire means the ropes will support the balloon
as opposed to the baloon pulling up on the gondola (in real life). This technique is
good enough to hold up a Christmas ornament. If you want one to be floating in the
air, supported by an anchor and anchor chain/rops, you probably need a piece of wire
clothes hanger in the core of the rope.
You can see that the scale of the balloons to the figures is not even close. Again, these are meant to be evocative, not everything to the same scale. Even for historical games you might want to go with this scale ratio, since figure and ground scale are often not equivalent.
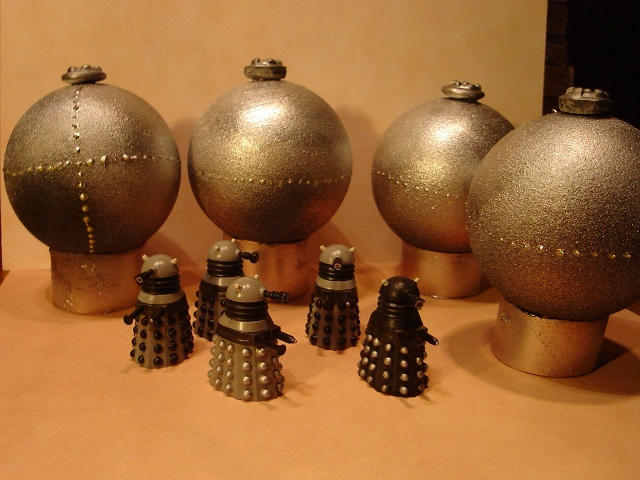 The decorated ornaments don't work very well for balloons, but do make nice terrain
pieces for campy scifi. With puff paint rivets, a hatch on top (which was made by
pushing a piece of clay into a toy car hubcap for a reverse print), and toilet paper
tube bases, these pieces look right at home with these guys.
The decorated ornaments don't work very well for balloons, but do make nice terrain
pieces for campy scifi. With puff paint rivets, a hatch on top (which was made by
pushing a piece of clay into a toy car hubcap for a reverse print), and toilet paper
tube bases, these pieces look right at home with these guys.
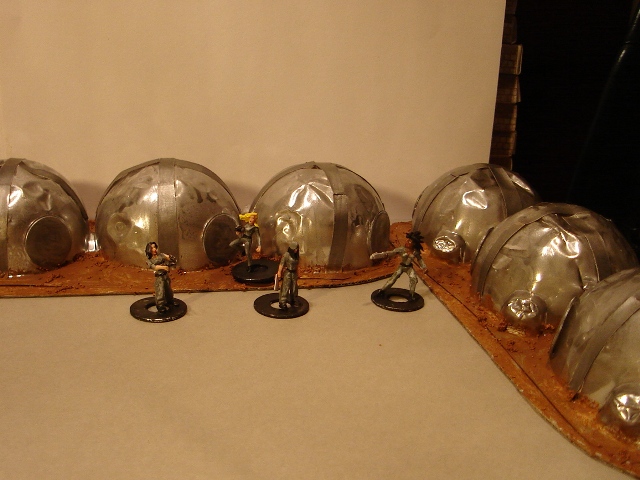 For a little more realistic sci fi material, the packing shapes for the ornaments
made these nice little tents. I only added some external frames (packing tape
slices) and doors (gaskets from inside bottlecaps).
For a little more realistic sci fi material, the packing shapes for the ornaments
made these nice little tents. I only added some external frames (packing tape
slices) and doors (gaskets from inside bottlecaps).
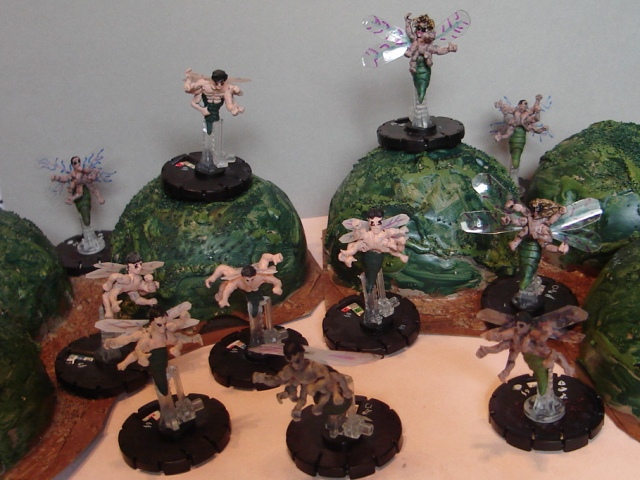 Or something a little more organic. These biopods just have puff paint veins and are
covered with some talus scatter.
Or something a little more organic. These biopods just have puff paint veins and are
covered with some talus scatter.
Breakout!
 What says Christmas more than rampant consumerism focused on toys that will
only hold a child's attention for a couple of days as a substitute for
actually paying attention to your offspring? Nothing! That's What! :)
OK, whatever. But at least there are tons of toys on sale and others that
will be soon, some of which could make nice wargaming terrain. And others
not so much so. The following tutorial focuses on one conversion, and
gives some ideas on why this one works.
What says Christmas more than rampant consumerism focused on toys that will
only hold a child's attention for a couple of days as a substitute for
actually paying attention to your offspring? Nothing! That's What! :)
OK, whatever. But at least there are tons of toys on sale and others that
will be soon, some of which could make nice wargaming terrain. And others
not so much so. The following tutorial focuses on one conversion, and
gives some ideas on why this one works.
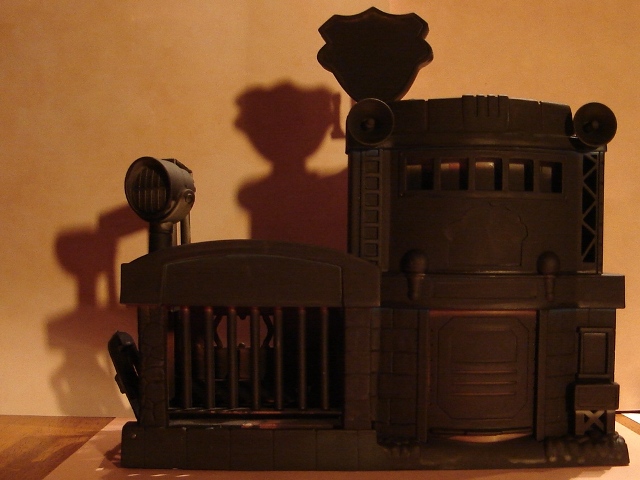 The first step after selection and purchase is to prime the toy. This is
very important for plastic toys as they don't hold paint well. I highly
recommend Krylon brand indoor/outdoor spraypaint. It bonds to nearly
everything, and provides a uniform surface. Nothing is more frustrating
than trying to paint two areas that should look the same, but don't hold
paint the same way due to different underlying materials.
The first step after selection and purchase is to prime the toy. This is
very important for plastic toys as they don't hold paint well. I highly
recommend Krylon brand indoor/outdoor spraypaint. It bonds to nearly
everything, and provides a uniform surface. Nothing is more frustrating
than trying to paint two areas that should look the same, but don't hold
paint the same way due to different underlying materials.
OK, so maybe there are a lot of things more frustrating. But just roll with that within the context, OK.
 Basic painting techniques follow the priming. A base coat of main colors.
A dark wash to fill in the nooks and crannies. Some drybrushing to highlight
edges. The metallic surfaces were done by mixing regular old too shiny
silver paint with a color (in this case, a spot of black). Don't mix them
up too much and your brush strokes can give texture as well as coverage.
Basic painting techniques follow the priming. A base coat of main colors.
A dark wash to fill in the nooks and crannies. Some drybrushing to highlight
edges. The metallic surfaces were done by mixing regular old too shiny
silver paint with a color (in this case, a spot of black). Don't mix them
up too much and your brush strokes can give texture as well as coverage.
 So what makes this a good candidate for terraining? Well, here are a couple
of ideas to consider for your selections:
So what makes this a good candidate for terraining? Well, here are a couple
of ideas to consider for your selections:
- First, it has a nice solid base. Not too tall for its footprint. Many toys will be wobbly because they want to look big by being tall. I think that makes for a bad piece of terrain. You want good solid footing for your figures, which starts with a piece of terrain that just sits there.
- It has many access points. This not only gives many options for figures to peek out (or in, for assaulting troops), but also lets you reach in without knocking tons of stuff around.
- Along with open areas, this piece has lots of ledges, vice being more "boxy". That provides cover/hiding points. Play is more fun/interesting when different positioning of figures results in different cover conditions.
- The front door opens and closes. So does the side prison door. Having some options to make tacitcally significant changes to the terrain is a big bonus.
- Also, the ramps raise/lower and even come off. And one of the floors inside raises and lowers on a screw mechanism. Not every toy needs that many different changable features, but fewer than two should make you think twice.
- The surfaces come with a decent degree of detail. To be sure, you can paint on extra details later, but if the piece comes ready with raised brick patterns, diamond tread, bolts/rivets, and even broken pieces, it will add to the final piece and simplify the conversion.
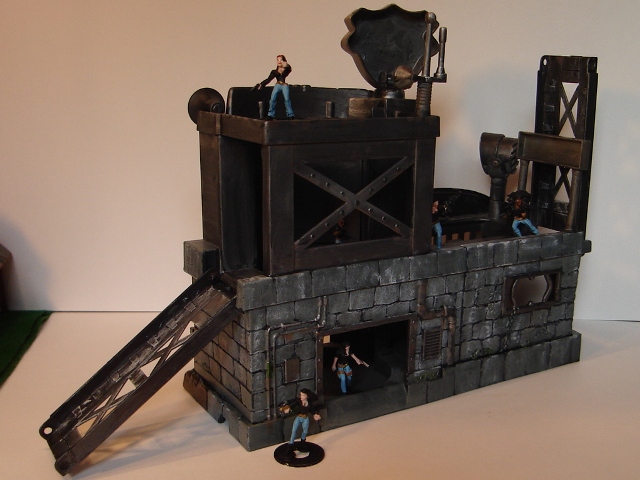
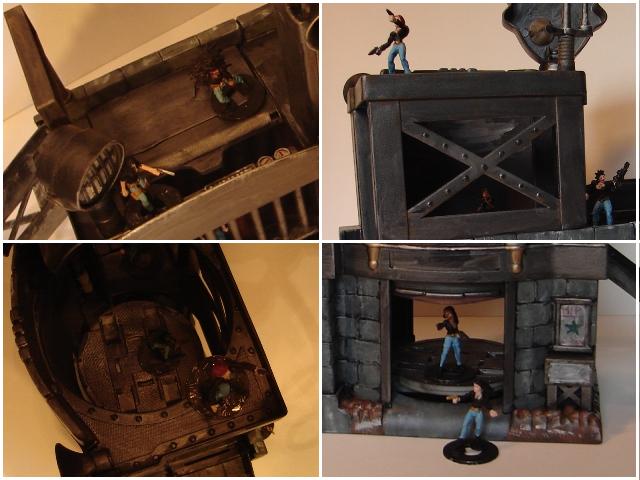 Here are a couple of close ups of specific details and how they work. Again,
I feel this is a particularly robust piece, with a lot of what makes a
good conversion (one that doesn't make you feel like you should have bought
something else because you are working to hard to make it work) toy.
Here are a couple of close ups of specific details and how they work. Again,
I feel this is a particularly robust piece, with a lot of what makes a
good conversion (one that doesn't make you feel like you should have bought
something else because you are working to hard to make it work) toy.
Hope this helps!
The Giant Turnip of Doom!
 Well, got this amazing version of
Apples to Apples
(which if you've never played, grab the cheapest version you can find and give
it a spin) that comes with a giant plastic apple container. If I had attempted
to turn that piece into terrain, I would be writing this from beyond the grave
right now. But, as the Fates sometimes allow, there was a form fitted plastic cover over the apple piece itself. Glee! The Fates (or my kids) also ate the
photo I took of it from my camera, so you'll have to imagine it. Not too hard,
I think.
Well, got this amazing version of
Apples to Apples
(which if you've never played, grab the cheapest version you can find and give
it a spin) that comes with a giant plastic apple container. If I had attempted
to turn that piece into terrain, I would be writing this from beyond the grave
right now. But, as the Fates sometimes allow, there was a form fitted plastic cover over the apple piece itself. Glee! The Fates (or my kids) also ate the
photo I took of it from my camera, so you'll have to imagine it. Not too hard,
I think.
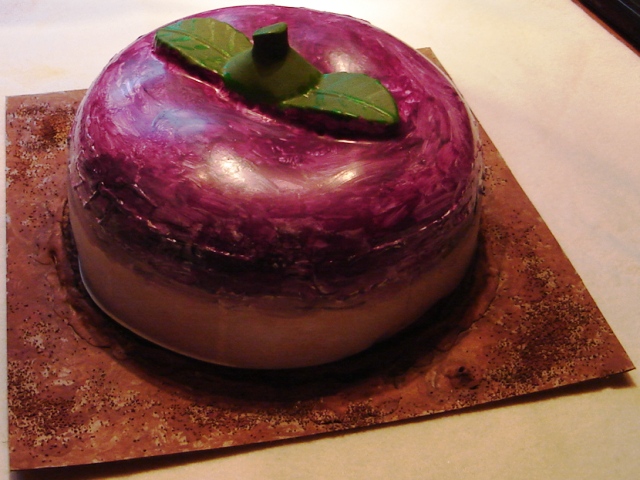 So, what do you do with ~9" diameter plastic apple top form? Make a giant
turnip for 28mm wargaming, of course. I set the apple down on the baseboard
and traced around it. The I laid a snake of
Crayola Model Magic
clay along the outline, and pushed it down into a ridge. The apple top piece
was used to cut a groove for the finished top to sit in.
So, what do you do with ~9" diameter plastic apple top form? Make a giant
turnip for 28mm wargaming, of course. I set the apple down on the baseboard
and traced around it. The I laid a snake of
Crayola Model Magic
clay along the outline, and pushed it down into a ridge. The apple top piece
was used to cut a groove for the finished top to sit in.
Model Magic is not the best wargaming clay, as it doesn't hold a lot of details. It does air-dry and is pretty cheap (compared to other modeling clay), so it's ideal for large areas you want to cover with rough grain detail. Like dirt clods.
The top and base were finished separately. I primed the apple top with Krylon Fusion white paint. I am a cheap guy by nature. However, I swear by Krylon Fusion for priming (gives an even painting surface for anything, including mixed materials) and Krylon Matte for final sealing (minis trapped in amber, without the yellowing). Then just painted her up. For turnipy effect, I used strokes that circled the apple top with the different colors.
 This shot just gives you an idea of 28mm minis (Ex Illis mangonel operators)
against the piece. So, what are they so excited about..?
This shot just gives you an idea of 28mm minis (Ex Illis mangonel operators)
against the piece. So, what are they so excited about..?
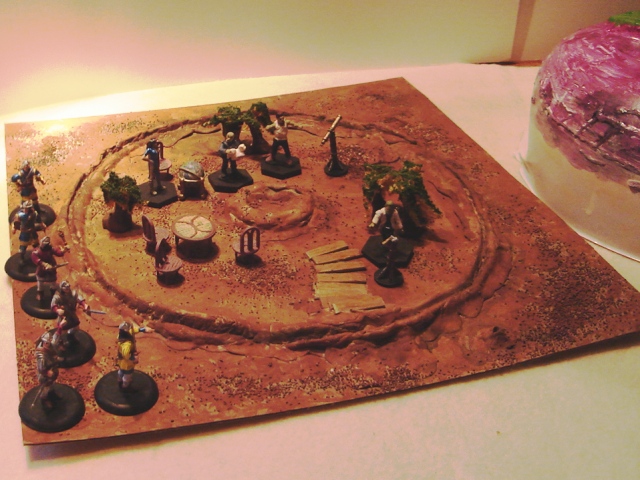 The base is also pretty straightforward. Since the piece is hollow, I put
a couple of stir stick pieces as a pseudo staircase and a mound for no
particular purpose. There are also a couple of extra globs for variety,
including one "in front" with a hole for a potential later added mailbox
and porch combo as a front door. A good scattering of talus helps make it
look dirt-esque. Again, it got a Krylon primer (black this time) and a few
layers of a few different browns, including a light drybrush of "nutmeg"
(a color name, not the spice!).
The base is also pretty straightforward. Since the piece is hollow, I put
a couple of stir stick pieces as a pseudo staircase and a mound for no
particular purpose. There are also a couple of extra globs for variety,
including one "in front" with a hole for a potential later added mailbox
and porch combo as a front door. A good scattering of talus helps make it
look dirt-esque. Again, it got a Krylon primer (black this time) and a few
layers of a few different browns, including a light drybrush of "nutmeg"
(a color name, not the spice!).
The figures, plants, and furniture give you a sense of scale. And they also indicate that beyond gnomes and anthropomorphic voles, you could easily get away with a pulp criminal mastermind (and his lackeys) living in the Giant Turnip of Doom!